Sunday, May 8, 2016

Quiz Prep

Before the quiz on Friday, I found many websites for practice to differentiate between the three laws and to be more familiar with the concepts of gases. Here are some links I used to prepare for my quiz:
http://ed.ted.com/lessons/1207-1-a-bennet-brianh264

http://www.sparknotes.com/chemistry/gases/ideal/section2.rhtml

http://www.proprofs.com/quiz-school/story.php?title=gas-laws-review-quiz-20-items

http://www.sciencegeek.net/Chemistry/taters/Unit7GasLaws.htm

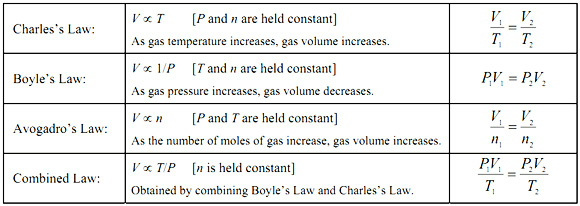
http://antranik.org/wp-content/uploads/2011/11/charles-boyle-avogadro-law-combined-gas-law.jpg

Avagadro's Law

The last lesson we had before the quiz was introducing us to Avogadro's Law. This law states that for a gas at constant temperature and pressure, the volume is directly proportional to the number of moles present, which means that the formula looks like this:
http://thescienceclassroom.org/wp-content/uploads/2013/04/Avogadros-Law.png
We had to also use our mole road map for the volume and mass of what we were dealing wit. One important number for STP we had to memorize was 22.4L.
Here is how it would look:
https://elearning.kctcs.edu/bbcswebdav/users/kmuller0001/SoftChalk%20Files/CHE%20120%20Chapter%205/Vn.jpg
Also, the graph would remain linear:
https://s3.amazonaws.com/classconnection/186/flashcards/5446186/gif/graph-avogadro-1514FE9BE407D213356.gif
Practice for this law:
http://www.chemteam.info/GasLaw/Gas-Avogadro.html
http://dvhsgaslaws.weebly.com/avogadros-law.html

Charle's Law

The second day in lessons, we added to our gas laws and learned Charle's Law. This states that temperature and volume vary directly with each other, using the same formula, and this is at constant pressure. It is important to remember that this also must be done in Kelvin, so to convert from celsius to Kelvin, you have to add 273.15 to the original C.
This is what the formula is directly for this, and what it would look like:
https://upload.wikimedia.org/math/9/6/8/9682f75ffd644c1e723156ad5919c8a6.png

http://wps.prenhall.com/wps/media/objects/4678/4790892/images/aabjvhoa.jpg
The graph of this relationship would also look like this:
http://chemwiki.ucdavis.edu/@api/deki/files/8688/=CharlesLaw_(2).jpg?revision=1
Here are more links for practice:
http://www.chemteam.info/GasLaw/WS-Charles.html
http://science.widener.edu/svb/tutorial/charleslawcsn7.html

Gas Laws Intro

Our first lesson in this unit introduced us into the characteristics of gases and measuring pressures. We learned that ages expand spontaneously to fill their container, have no definite volume, are highly compressible, form homogeneous mixtures, and have molecules that are relatively far apart from one another.
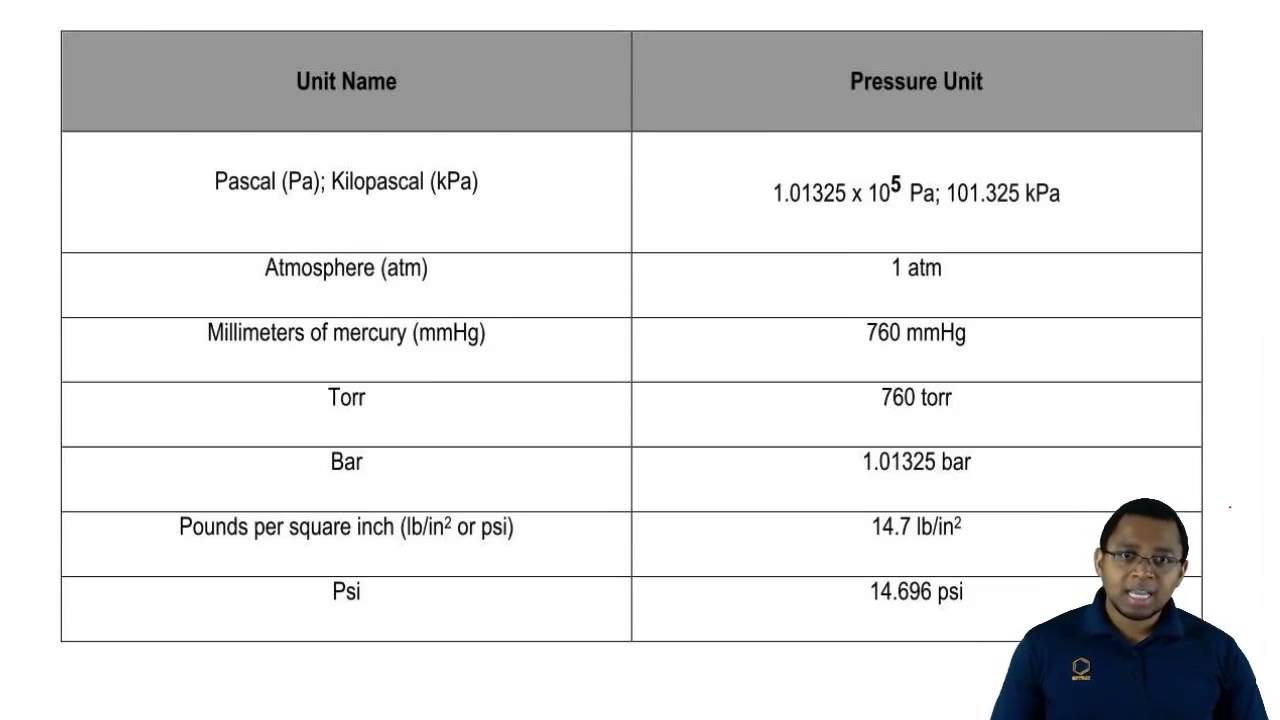
Then, we went into converting into different units of pressure, where we had to memorize a similar chart:
https://i.ytimg.com/vi/mQn1Lat73AE/maxresdefault.jpg

Then, we learned about Boyle's law, which come of the basis of:
http://patentimages.storage.googleapis.com/EP0023910B1/imgb0016.png
This law states that relationship between pressure and volume is an inverse relationship, and holds true at constant temperature and moles. We then did some practice problems and looked at how the law works. 
https://d2gne97vdumgn3.cloudfront.net/api/file/jMkrpsxQ5epbGnRIvowW
Here are some links to help with this lesson and overall gasses:

Second Phase Lesson

The second lesson had much more information than the first, and was pack with memorizing graphs and flow charts.
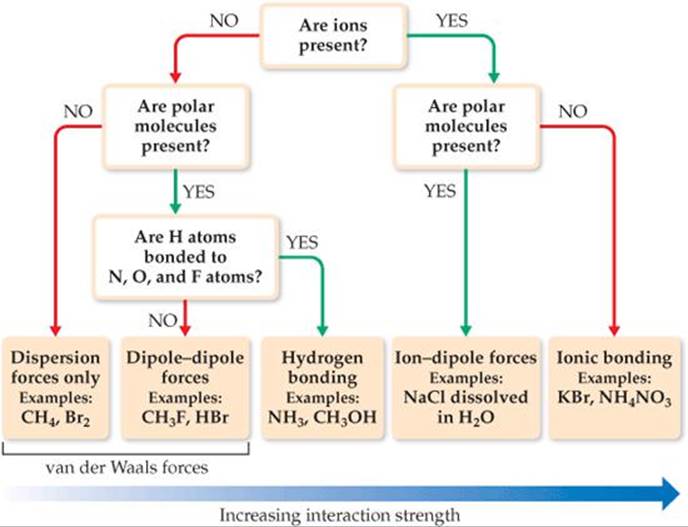
To start, we went through the flow chart to determine what kind of inter and intramolecular forces were within a compound.
This is the flow chart that we followed, and we went over being polar and how hydrogen bonding examples needed to make FONCLs (phone calls).
http://schoolbag.info/chemistry/central/central.files/image1460.jpg
We then went to look at examples that determined what state a compound was in, thus making us determine if the intramolecular force was covalent or ionic, and what the intermolecular force was based on the flow chart.
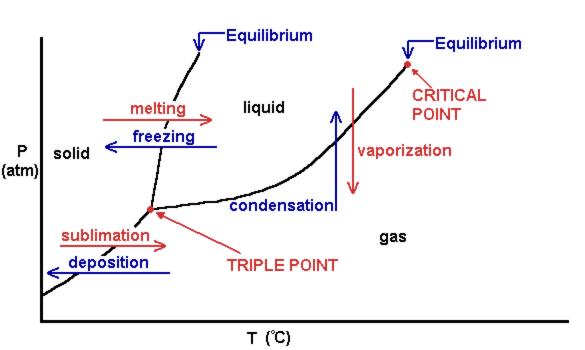
Next we looked at various curves so we could see the differences in phase changes. This is similar to what ours looked like.
https://writer.zoho.com/image.do?imgurl=43f284c1e0ba6646e2d2a98b8a52495191ec6d7cf7d22a0458f6d938d98b4eb1a7800cecd6ac3d9ca48373fdd0cecca6
We then looked at phase diagrams and did situations to where the compound would be.
http://www.kentchemistry.com/images/links/matter/Phase.gif

Here are some extra links for practice:
http://chemed.chem.purdue.edu/genchem/topicreview/bp/ch14/phase.php
http://www.sciencegeek.net/APchemistry/APtaters/PhaseDiagrams.htm
https://www.khanacademy.org/test-prep/mcat/chemical-processes/covalent-bonds/a/intramolecular-and-intermolecular-forces

New Energy Phase Unit

Lately in Chemistry, we have gone over the Unit of phase changes where we have gone through the bonding forces as well as the physical properties between the different phases. First we went over the differences in energies, where kinetic is in motion. Also, and important thing to remember was energy lost=energy gained.
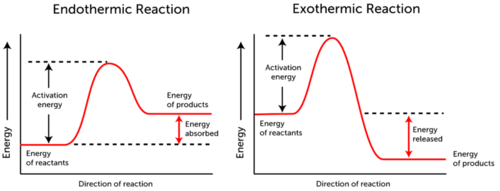
Next we learned about end and exothermic processes.
Here is a picture demonstrating how endothermic take in energy and exothermic release energy
https://dr282zn36sxxg.cloudfront.net/datastreams/f-d%3Adf0a2687d885c997ec852a60b09181c51b0a234ada9136e0288d4e8c%2BIMAGE_THUMB_POSTCARD%2BIMAGE_THUMB_POSTCARD.1
The last big part of this lesson was the formula Q=Mc(Tf-Ti)
to plug into this formula, you must know that Q is heat in joules, m is mass in grams, c is specific heat in (J/g C), and T is change in temp.
This shows the process:

https://i.ytimg.com/vi/0jKHtBJNAYM/maxresdefault.jpg
https://i.ytimg.com/vi/vQ6VIHqfVLc/hqdefault.jpg

Here are some more links for practice and understanding of this:

Sunday, April 17, 2016

Making fuel and Boat

For the final part of our Biodiesel explorations, we went back into lab and made biodiesel that we later used in our boats. After making it in the lab one day, we had to let it sit overnight so it could separate, and we could remove the bodiless from the glycerin and glycerol.
Here is what that looked like:

Then, with this fuel we built a small putt putt boat out of an Altoids tin and fueled it in a candle with the fuel we made. Our boat got the third fastest time, and for that we got extra credit!
Here is what our boat looks like:
Links to how to build a putt putt boat:
http://sciencetoymaker.org/boat/
https://www.youtube.com/watch?v=0ki9Kta8g14

Finished video

We have finished our Biodiesel video, and have submitted it onto the contest page. We wrote up a song and had a friend sing it for us while we did various mini videos in the background.
Here are the lyrics:
Also, here is the link to our video to watch!
https://www.youtube.com/watch?v=t_0DWJnZYcQ

Beginning Video

For our new Biodiesel unit, we have to make a public service announcement video on the use of Biodiesel fuel. To begin, we had to start researching since we knew nothing about it before. So far, just in the little research I have done, I already know it is a much cleaner alternative to diesel fuel, and uses ingredients such as old restaurant oil and vegetable oil.
Here are some links that we learned this from:
http://www.afdc.energy.gov/fuels/biodiesel.html
http://biodiesel.org/what-is-biodiesel/biodiesel-basics
http://www.nrel.gov/learning/re_biofuels.html
http://www.aa1car.com/blog/biodiesel_logo.jpg


http://www.ebb-eu.org/infograph/biofuels_IG_teaser2.jpg
We will post the video when we finish for the contest!

Molecular Shapes Practice

Since I have been struggling understanding molecular shapes and how to apply this concept, I decided to look up some videos and practices to do before our final test, this way I should be more comfortable. http://www.softschools.com/quizzes/chemistry/lewis_structures_molecular_shapes/quiz939.html
http://people.cornellcollege.edu/cstrong/courses/vsepr_practice1.htm
http://butane.chem.uiuc.edu/anicely/chem102Dfa10/Worksheets/Worksheet13_VSEPR_Key.pdf
http://ths.talawanda.org/~bramblen/classroom/Pictures/molecularshapenotes.JPG
YouTube Video Help:
https://www.youtube.com/watch?v=keHS-CASZfc

Molecule Shapes and Resonance

In class for our second lesson, we talked about the various shapes a molecule can take as well as resonance  To have resonance, it means that a compound had multiple bonds, and when you move one of the bonds it has, it must fit in any given place. This is what it looks like:
https://upload.wikimedia.org/wikipedia/commons/thumb/e/ed/Carbonate-ion-resonance-2D.png/380px-Carbonate-ion-resonance-2D.png
As shown, the double bond can be moved to any of the three sides of the molecule, and it is still the same; This means it has resonance.
The next thing that we talked about are the selection of shapes that the molecules that we deal with can have. The five primary shapes that our teacher told us we would be working with are: a trigonal planar molecule has three bonded entities to the central atom and the central atom does not have any lone pairs, a tetrahedral molecule which has 4 bonded entities around one central atom, a linear molecule has two bonded entities to the central atom and this does not have a lone pair, a trigonal pyramidal molecule which has three bonded entities and one lone pair of electrons around the central atom, and a bent molecule which has two bonded entities with two lone pairs of electrons around the central atom.
This is what these five look like:

http://cnx.org/contents/d5d1d182-3eb0-419a-bfda-3615e56fafea@1
Here are some more links to help. I found the shapes to be fairly tricky to remember and practice.
http://intro.chem.okstate.edu/1314f00/lecture/chapter10/vsepr.html
https://www.chem.wisc.edu/areas/clc/organic/343/02_resonance_structures_343_ans.pdf

First Unit Lesson

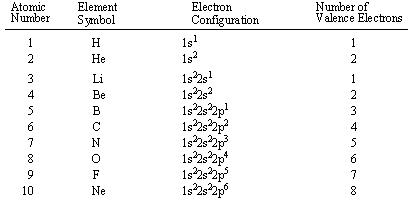
Our first lesson for out new unit over chemical bonding was reviewing the Lewis Dot structure that some of us learned back in Freshman year. This model is when you take the element symbol and place the electrons around the outside on each of the four sides clockwise and singularly, then you can double.
http://www.middleschoolchemistry.com/img/content/multimedia/chapter_4/lesson_6/lewis_dot_table_big.jpg
We also learned about the octet rule, which states most elements can only hold eight electrons in their valence shell, but we also leaned there are exceptions to this. These are that Hydrogen and Helium only have up to two, Boron requires six, and Beryllium only needs 4. 

To end the lesson, we went over the Have, Need, Share chart to determine the number of electrons and bonds to place on the diagrams. 
Here is what that type of diagram looks like:


Here are some additional links for help:

Sunday, March 6, 2016

Periodic Trends

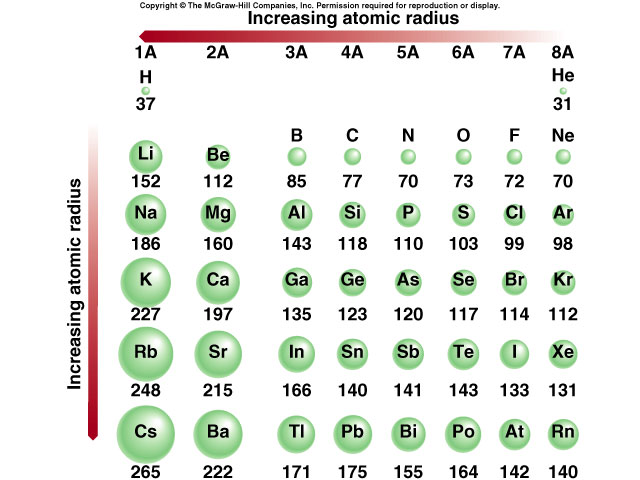
We spent the last week before our unit test reviewing periodic trends, and putting them to practice with a few activities. The first trend is atomic size, where atoms get larger because you move down a group, and also get bigger as you move from right to left, leaving the largest atoms in the bottom left corner. The next trend is ionization energy, which is the energy needed to remove an electron from a gaseous state atom, and it results in forming a cation. This trend is at its greatest in the top right. The third trend regarding only the s and p blocks, along with the two previous trends is electron affinity, which is the ease with which an electron may be added to an atom, creating an anion, otherwise, the energy given off when an electron joins an atom, and this gives off negative energy. This trend is also at its greatest in the top right. The final trend we learned about in our supplement is electronegativity, which is the tendency of an atom to draw electrons toward itself when chemically combined with another element, and this is greatest to the right and up, but does not include noble gases.
This overall demonstrates all the trends:

https://upload.wikimedia.org/wikipedia/commons/4/41/PERIODIC_TRENDS.jpg
Here is just atomic radius:

http://www.kentchemistry.com/links/PT/atomic_radii.jpg
Here are some practice links:
http://www.acschools.org/cms/lib07/PA01916405/Centricity/Domain/362/Periodic%20Trends%20Worksheet%20Answers.pdf
http://www.sfponline.org/uploads/71/periodictrendspracticesub1106.pdf

Quantum Numbers

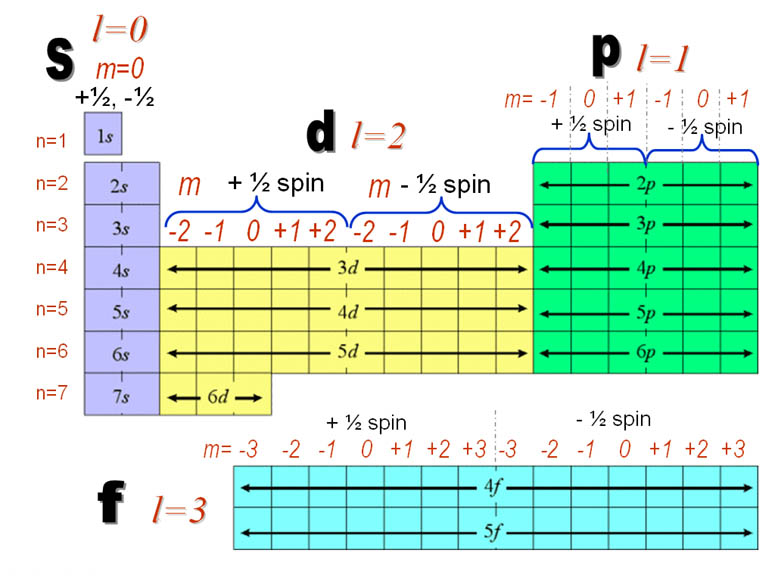
The final lesson before our first quiz was quantum numbers. We learned that each element is assigned to four quantum numbers, being first the principal quantum number, n, which is the period number for all except d orbitals, and it labels the shell number. Second is the Angular Momentum Quantum Number, l, and this number is determined from the type of sublevel, either 0,1,2,3 for s,p,d,f. Third is the Magnetic Quantum Number, m1, which labels the orbital subtype, and corresponds with the number of orbitals in each orbital type. So, if it were an s orbital it would only be zero, with only one space for the two electrons to be  _ . If it were in the p orbital, it would have three spaces _ _ _ labeled left to right -1,0,1. This will expand each level one on each side with the two orbitals in each level. The fourth part of the Quantum number is the Spin Quantum Number, which is the direction in which the electron is facing in the last orbital. Therefore, if the electron in the figure is facing up, it is given the +1/2, and if it is facing down, it is given a -1/2.
Here are some links to help practice:
http://highered.mheducation.com/sites/0072396814/student_view0/chapter8/interactive_quiz_1.html
http://chemed.chem.purdue.edu/genchem/topicreview/bp/ch6/quantum.html

capthttp://www.chemistryland.com/CHM130S/10-ModernAtom/Spectra/PeriodicTableWithQuantumNumbers.jpg

Post Quiz

Since I did not do as well on the quiz as I had hoped, I found some extra links to help me practice. Many of the mistakes were misunderstanding the concept or what the question was asking for, but some others I did not properly use the conversion factors we were supposed to memorize .
Here are some of the practice links I found:
http://www.chemteam.info/Electrons/calc-energy-freq-wavelength.html

https://www.khanacademy.org/science/chemistry/electronic-structure-of-atoms/electron-configurations-jay-sal/v/electron-configurations-2#!

http://terpconnect.umd.edu/~wbreslyn/chemistry/electron-configurations/electron_configuration_worksheet.html

Monday, February 29, 2016

Flame Test Lab

The first experiment we did with this unit was the flame test. It wasn't very difficult, but instead it was much more fun to watch and observe. All we had to do was turn on the Bunsen burner and put the sticks from the sample cups in the flames and observe the colors produced. This went along with our lesson when we were talking about the wavelengths of different colors on the electromagnetic spectrum.
Here are some links to show how it worked:
https://www.bing.com/videos/search?q=flame+test&&view=detail&mid=24560B8CD7C7DE0537DE24560B8CD7C7DE0537DE&FORM=VRDGAR
https://www.bing.com/videos/search?q=flame+test&qpvt=flame+test&view=detail&mid=7ADBEC8E4F2CD7DC57F97ADBEC8E4F2CD7DC57F9&FORM=VRDGAR
Here is what one of our tests looked like:


Here is the general idea of what it would look like:

capthttp://chemistry.com.pk/wp-content/uploads/2014/08/Metal-Ion-Flame-Test-Colours.jpgion

Sunday, February 28, 2016

Electron configuration

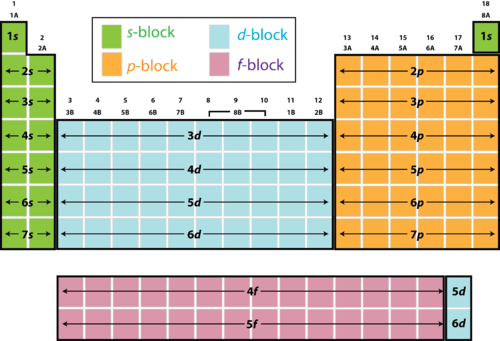
In our second lesson, we started to learn about electron configuration. We started by coloring our periodic table into the four sections, s,p,d,f; with this one class came up with Smart People Dropped First Semester to remember the different blocks. These blocks are used to create the identity along with the numbers. Here is what it looks like:(
https://dr282zn36sxxg.cloudfront.net/datastreams/f-d%3A0d99818a52b825e7cf4e51d8c68a3b0746467d8e519cd5fb7b6f914e%2BIMAGE_THUMB_POSTCARD%2BIMAGE_THUMB_POSTCARD.1


In the s block, there is 1 orbital, that can be filled with 2 electrons
The p block has 3 orbitals with 6 electrons
The d block has 5 orbitals with 10 electrons
The f block has 7 orbitals with 14 electrons
These are the maximum amounts of electrons that may fill up the orbitals that are present in each block. First they must go in with positive spin, and then fill in with negative spin once all the orbitals have filled up.
http://img.sparknotes.com/figures/0/083ee1e849c82204c3d7c342d336a448/fig1_5.gif

We then learned about shortcuts when naming the elements with their configurations. For this, you can only use the noble gases, and they must be the most previous gas before the element you are trying to name, and you also cannot use a noble gas as its own shortcut.

Beginning of Unit

Recently, we started a new unit concerning more directly of the periodic table and looking at trends and properties of elements and different ways to write them. The first lesson was on wavelengths, frequencies, and energy. First, we looked at what a wavelength looks like, and the different parts of it. Here is what that looks like:
http://images.tutorvista.com/cms/images/83/wavelength-image.PNG
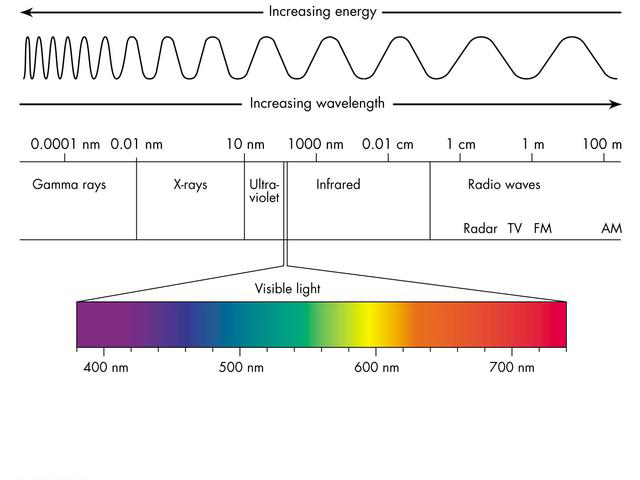
We then talked about the electromagnetic spectrum, and the electronic structure, which is the arrangement of electrons. We learned that visible light is a form of electromagnetic radiation, otherwise known as radiant energy, and the light that we see is connected with the wavelength of a number x 10^-7. An important thing to remember is that within visible light, violet has high energy and red has lower energy, and this corresponds with the frequency.
A long wavelength=low frequency=low energy
A short wavelength=high frequency=high energy
http://www.cyberphysics.co.uk/topics/radioact/Radio/EMSpectrumcolor.jpg

Tuesday, February 9, 2016

Titration Lab

For the last few days, My lab partner and I have been running an experiment very similar to the one we did last week, percent acetic acid in vinegar, but this time we had to ultimately find the molar mass of an unknown acid. For this lab, we titrate an acid we are given to as I said before, find the molarity of it. First to start the lab, we had to standardize the base solution, so I weighed about 0.2g, added it to a Erlenmeyer flask by rinsing it with diluted water, added about 100mL of diluted water, added 2 drops of indicator, and  finally titrated it until it turned pink. We did this twice and averaged the two for our calculations. When the solution turns pink, we know that all of the KHP had been reacted. Next, we did the same thing by titrating the unknown acid that we had to weigh. Finding the molarity in the first two and solving for just the moles of HA is what was then used for more calculations.
Here are some pictures from the lab:

Also, Lauren broke an Erlenmeyer flask when we were cleaning up lab:

Monday, February 8, 2016

Final Lecture

Our last lecture before two labs and a unit exam was over problems with acids and bases involving stoichiometry. With these types of problems we were asked to solve for a particular unknown, generally the pH, concentration, or volume. Most of the problems gave us enough information to directly answer the question, while others didn't. such as those which we had to find the limiting reagent with stoichiometry first. Also, all of the problems we did in class were a 1:1 molar ratio, which was nice to start off with, but also makes it more challenging when problems have different molar ratios. These problems generally are associated with acid-base titrations, so we learned also about the different materials and parts used when conducting a titration.
In addition to doing the stoichiometry we are already familiar with, we were also introduced to the formula MaVa=MbVb, but this only works for a 1:1 molar ratio, and thus it would need an additional step at the end to include that ratio.
Here is a link to practice these problems:
http://www.chemteam.info/AcidBase/titration-problems-2.html
And here is a quick walk through it:
http://chem.illinois.edu/CLCtutorials/102/WASB/SeeIt.html

We also slightly talked about Titration Curves within our lesson, which show the relationship between pH and the volume.
http://image.tutorvista.com/content/ionic-equilibrium/titration-curve-strong-acid-base.gif