Thursday, January 28, 2016

First Lecture

In class on Wednesday, we had our first lecture on beginning to become familiar with acids and bases. We first learned some of the generic properties of each an acid and a base. These properties will help distinguish between the two when we have to solve some problems.

http://www.solpass.org/6-8Science/8s/images/acid-base_properties-small.png

Some things to keep in mind are when group 2 metals break apart, they release twice as much OH-, and group 1 and 2 create strong bases with OH-
The first types of acids and bases we talked about were Arrhenius, where the acids produce hydrogen ions in a solution, and bases produce hydroxide ions in a solution. Depending on what they are reacting with, the compound will break apart and the hydrogen or hydroxide concentration will in turn increase. This will depend on what is being dissolved. Something else to remember is that water is an amphoteric substance, which means that it can be an acid or a base.

pH scale for acids and bases:
0-6.9 acidic
7.0 neutral
7.1-14 basic

The next type we learned about was Bronsted- Lowery acids and bases. In this type, the acids will donate a proton (H+) and the bases will accept a proton. In these, there are also conjugate acids and bases, where acids will produce a conjugate base, and vice versa. Here is how this works:

http://study.com/cimages/multimages/16/bronstedlowryexample2complete.png


Here are some other links for this topic:
http://chemed.chem.purdue.edu/genchem/topicreview/bp/bronsted/bronsted.htmlhttp://www.qldscienceteachers.com/junior-science/chemistry/acids-and-bases

Wednesday, January 27, 2016

Vitamin C Lab

Monday and Tuesday in class, my partner and I conducted the Vitamin C Lab. When we got back into lab, there were four pipettes filled with our four juices to test for concentration, these being : Pear Nectar, Apple Juice, White Grapefruit Juice, and Golden Goodness V8 Juice. Two of our classmates had to prepare the standard solution for the rest of the class. In the last two pipettes, there was a starch solution, and iodine, which had to be covered by aluminum foil. To start the test, we took a test tube and dropped 20 drops of the standard solution, then three drops of starch. Next, we dropped single drops of the iodine into the tube, and kept counting the drops until it turned from clear to dark blue. We repeated this for three trials and for each of the test solutions. We knew that the dark blue indicated the end because this meant the reaction was over between all of the vitamin c and iodine. Now we have to do a lab report on the results of the different concentrations.
Here are some pictures from the lab:

here, the two tubes on the left have not had iodine added yet
Here is a similar, and even simpler lab on this concept:

Wednesday, January 20, 2016

Notes in class

We have been going over Aqueous solutions during class, and this week we went over chemical reactions. We then started talking about using molarity with the stoichiometry that we have already learned.
Here is the flowchart that we completed in class to go through all the steps in the process:


The practice problems we did in class were not difficult at all, instead they were nearly identical to what we had done before. The first problem was a limiting reagent problem in which we had to add an extra step to help convert for the molarity of the solutions. First to find the mass we had to use the moles of the solute over total volume of the solution (solute and solvent together) to be able to find the moles in the reactants. Then we did conversions we were familiar with to convert to grams by using normal mole to mole ratio and molar masses. Then we knew whichever created the smaller mass was the limiting reagent, just like previous problems we have worked with. 
And here is the chart nearly identical to what is in our book, and this is what Mrs. Frankenberg showed us to help solve for the next steps in solving problems like this.
http://img.docstoccdn.com/thumb/orig/641889.png
Here are some links to help with these types of problems:
http://misterguch.brinkster.net/PRA048.pdf
http://www.chemcollective.org/activities/tutorials/stoich/solution_stoi
http://www.eiu.edu/eiuchem/genchem/tutorial4.pdf

Tuesday, January 19, 2016

Molarity Lab day 2

On the second day of the lab, there wasn't much of the procedure to be done. The solid from the solution had sat overnight and dried in the filter paper that we used. All we had to do was use the same balance as we did in day one to weigh the mass of the product made. With the two masses, we were able to subtract to then find the difference. Then, we worked backward in a molarity problem to find the molarity of the silver nitrate that was at the crime scene. We converted the mass that we had found to grams, used the mol to mol ratio, and divided by 0.01L, which was the amount of the unknown solution that we used. In the end, we came to the conclusion that Mr. Green was our suspect because the molarity we calculated fit within the range of his description. Finally, we had to make a lab report with our partner over the entire lab.
Here are some links to help with the calculations that we did in our lab:
http://chemistry.about.com/od/examplechemistrycalculations/a/How-To-Calculate-Molarity-Of-A-Solution.htm
http://www.chemteam.info/Solutions/Molarity.html

Wednesday, January 13, 2016

Molarity Lab day 1

Today in class, we conducted the molarity lab This was somewhat set up like the game Clue, with various suspects with different weapons, from which we have to determine who killed Miss Scarlett. From the background information, we have two available test solutions, NaCl and Na2CO3, and two different possible murder weapons, AgNO3, and KI.
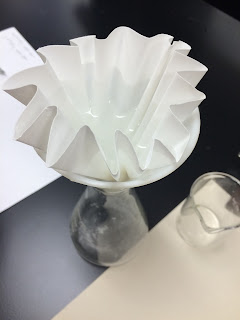
First we had to set up four double replacement reactions to figure out how the possible murderous solutions would react with the known solutions provided. With this, we found that both reactions with KI created two aqueous products, otherwise would not precipitate, and therefore these KI cannot be the murder weapon. In our experiment today, we combined 10mL of the unknown solution with 25mL of Na2CO3. This turned into a white fluid that looked like milk, but when looking closely, we could see that there was crystallization occurring. Next, we took filter paper, weighed it on the balance, and placed it in a funnel over a beaker. The crystals then collected in filter paper when the fluid drained out and this was left in class overnight to dry.
Here are some pictures from our experiment:


Tuesday, January 12, 2016

Dilutions lab

Since we have been learning about how to calculate the Molarity and Liters in a dilution, we did a lab to go along with it at the end of class. To start, we had a small sup full of 9mL of water, and to this we added 1mL of blue food dye. Next we took the pipette and removed 1mL of the mixture and put it in the next cup. Then, to this cup, we added another 9mL of water, and the food dye became slightly lighter. We continued this pattern of 1mL from the previous cup and 9mL of water until the cup was clear, and there was no more dye to be seen. After doing this, we did some dilution calculations to see the concentration in each cup.
here is how to do this math: http://www.quansysbio.com/dilutions
https://www.youtube.com/watch?v=v6dnEp58mVk

These are all the cups, from most concentrated to least from our experiment.